|
|
|
FreeDOS Live-CD modifications made easy

FreeDOS is an open source project and covers an open version of MS-DOS. It can be used free of charge but it's GPL licensed.
FreeDOS is - at least - MS-DOS 3.3 compatible. But it even supports FAT32 and Long File Names.
FreeDOS can be >downloaded< as an installation package, but also as a >Live-CD< (this bootable CD can be used as a base for forensic tools or virus scanner, too). A seven-zip'ed image can be downloaded also >here<.
The FreeDOS Live-CD is not usable with modern PC hardware with SATA CD drives, but can be modified.
Changing the .iso Image isn't really difficult.
You have to use a tool like >WinImage< or better, >UltraISO<, to edit the .iso file without rebuilding the whole CD from scratch.
After loading the ISO image of the CD, navigate to folder isolinux, then down to data - you should be able to see something like this:

Extract the file e.g. by drag and drop to the Desktop (or your favorite place), then rename it to fdboot.img.gz (so >WinRAR< or an other tool can be easily used to expand the file).
Expand the file fdboot.img.gz with an windows archiver or with >gzip< -d {filename}.
You should get a file named 'image'. Rename it to 'image.img'.
This is the unpacked, bootable floppy image (360KB).
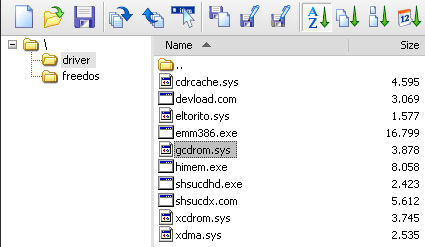
Now you can use >WinImage< to extract and later replace files.

In Folder 'driver', you can place >GCDROM.SYS<, a SATA DOS CD driver.
Alternatively, try DELLs extcd.sys at their >special DOS driver page<.
In the root directory, you can extract 'fdconfig.sys', that's the equivalent of 'config.sys' of the original MS-DOS.
Now add in 'fdconfig.sys' a menu command line below the '5.':
MENU 6. FreeDOS Live CD with SATA-CD driver
and after the line with the 'XCDROM.SYS' command, enter:
6?!DEVICEHIGH=A:\DRIVER\GCDROM.SYS /D:FDCD0000
You have to modify then in folder 'freedos' also 'FDAUTO.BAT' (strange but true, this file is a unix text file without 'Carriage Return'). In line# 6, add a number:
for %%X in ( 3 4 5 6 ) do if "%config%"=="%%X" goto livecd
Replace both above mentioned files at their original place (can be done easily with WinImage again just by drag and drop). Save the 'image.img' file.
Rename it to 'image' only (without file extension) and repack it with gzip.
Rename the resulting file 'image.gz' to 'fdboot.img'.
Instead of doing the above described steps by yourself, you can download also a ready modified 'fdboot.img' zipped >here<.
Replace the original 'fdboot.img' in the ISO file with the new one (easily done with UltraISO for example again with drag and drop).
Save the ISO file and burn it. Your SATA CD compatible Live-CD is ready.
This can be done for USB CD-ROM drives in a similar manner, too.
There is still a >Panasonic driver page< available, but meanwhile in their archive.
This is an executable, but you can open it with WinRAR instead of executing it.
Look for a folder named 'F2H'. There are two important files:
USBASPI.SYS
and
USBCD.SYS
Take these two files and place them like above described for 'GCDROM.SYS' in the 'driver' folder of the Live-CD. Modify 'FDCONFIG.SYS' also:
... DEVICEHIGH=A:\DRIVER\USBASPI.SYS /v /w /e
... DEVICEHIGH=A:\DRIVER\USBCD.SYS /D:FDCD0000
If you like, modify 'FDAUTO.BAT' again, like above already mentioned.
Btw. Some hints for using USB devices with DOS can be found >here<, too.
Finally, you can also transfer the whole CD image to an USB memory stick, to boot from it then.
|
|


